Monday, 27 August 2018

Altered Bath Storage Containers with Gypsy Soul Lasercuts

Hey there!I'm  here today with a simple project showing how easy it is to spruce up small containers to coordinate with your decor. My bathroom has beach-themed items and shades of beige and soft blue, so I came up with this duo :


As you can see, the glass jar just received a layered bow and dangling shells and chipboard pieces, but the other piece underwent a bit more of a transformation; the container coordinated with the room's former colours but hasn't suited it in a long time...


I decided to add texture by podging some issue paper to the surface, then coating it with tan acrylic paint when dry.


I dry-brushed the surface with small amounts of grey and white, then rubbed Rose Gold Metallique Wax over the creases for added definition.


The chipboard border and small pieces were painted with cream-coloured acrylic paint, then misted with Tattered Angels mists, blending a couple shades of blue and a light silver colour. When hat was dry, I brushed on a layer of semi-gloss clear finish to make these items stand out a little more from the background.


I used twine to attach the dangling chipboard elements and added some small shells. I layered decorative jute ribbon below the small twine bow on both containers


A few slightly larger shells were added to the border strip along the bottom edge.


I love that Gypsy Soul chipboard can be used in so many ways; a few small pieces like these can totally change the look of plain household items, and they can be finished to suit any theme. I love making elaborate and eyecatching projects  a lot of the time, but I appreciate the chance to do something simple like this to make use of something I already have as well. I hope you're inspired to give some of the items around your home new life and added interest....have a wonderfully creative week, and thanks so much for stopping by!

GYPSY SOUL ITEMS USED

Under the Sea Border

Beach Shape Set, small

OTHER ITEMS USED

Tissue paper
Mod Podge
Art Alchemy Metallique Wax, Rose Gold
Decoart acrylic paints
Tattered Angels Glimmer Mists
Wired jute ribbon by Recollections
Natural twine
hot glue gun

Monday, 23 July 2018

Washi Wheelbarrow for Gypsy Soul Lasercuts

hey there! I'm here today with a little wee addition to my collection of storage items; I discovered that the adorable chippie wheelbarrow was the perfect size for the 5 small rolls of washi tape I keep handy to use in my journaling Bible and finished it to coordinate with the GSLC storage caddies on my worktable.


This is the blown-out view showing how the pieces fit together; be sure to put the hole all the way through if you cover both sides of the side pieces with paper; the axle for the wheels must go through these.

I didn't do anything too fussy to this piece, but the new Flourished Chain piece was a perfect embellishment. I used paper from a 6x6 Momenta pad to cover the main part of the wheelbarrow, then inked the edges with Distress Ink in Vintage Photo. I left the handle section bare so I could use the same finish on it as I used on the chain and the wheels


The chain, handle and wheels were all primed in brown, then heat embossed with Distress Embossing Powder in Vintage Photo, then sprinkled just a little Colorbox embossing powder in Peridot over the surface and heat embossed that as well then rubbed with Finnabair's fabulous Waxes in Lucky Emerald and Rich Copper (I just rubbed each one onto the surfaces randomly, here and there, to create a blended look.)


The small piece to the left in the photo above keeps the wheelbarrow standing; as an afterthought I added some of the embossing powder there as well, although in the photo it appears darker.

The photo below gives a closer look at the light flecks of green on the embossed surface; it's fun to combine and layer embossing powders to create new effects! I prefer layering them because if you combine the powders you can't pour them back into either of the original bottles, but if you don;t mind losing a bit of excess powder, it's definitely easier to get a uniform finish that way.


I am in love with the new flourished chain pieces, which come in 3 different sizes (I have used the Small) and it makes me happy that I was able to use this cute 3D wheelbarrow to create useful storage-now I have my eye on the Flower Cart....hmmm....what can I store in that one??!

GYPSY SOUL ITEMS USED

Wheelbarrow 1:12
Flourished Chain Small-coming soon!

OTHER ITEMS USED

Ranger Distress Ink and Distress embossing powder-Vintage Photo
Versamark Ink
Colorbox embossing powder-Peridot
Finnabair Art Alchemy Waxes-Lucky Emerald; Rich Copper

Sunday, 22 July 2018

"Berry Cherry" birthday card for Scrap & Craft

Hello dear crafters! Lynne here with a step card featuring a combination of papers from two Studio75 collections, "The Berry Copse" and "Cherry Blossom". I found the neutral papers in the two packs coordinated beautifully together, and the soft green was a lovely complement as well.

I started with a 6" x 12" strip; after a few folds and cuts I ended up with this stand-up shape


I left the chipboard piece uncoloured as the natural shade matched the papers so well:


The Berry Copse paper pack, 12x12
Cherry Blossom paper pack, 12x12
Organza Rose trim , ecru
Scrapiniec Happy Birthday

So glad you stopped by, and I hope you enjoyed seeing my card!! Have a wonderful, colourful, creative week!

Monday, 9 July 2018

"Wish" card and bookmark for Gypsy Soul Lasercuts

Hello crafty friends! I recently made an easel card and posted it on my Facebook page, and one of my online friends admired it and said she'd love a card like that for her birthday, which just happened to be coming up soon...I decided to use this gorgeous frame and coordinating goodies to create a unique card for her, then I thought I'd add a bookmark to match (this is being mailed out of the country so I had to keep everything relatively flat)


I started out by cutting a 5 1/2" strip from double-sided patterned paper ( make sure you like both sides unless you don't mind adding panels to the inside!), then I distressed the edges and inked them in charcoal grey.


I scored the rectangle at 6" and at the 3" mark on one side, then folded it in half.


I border punched along the bottom edge and lightly inked the leaves, I added a contrasting piece of paper behind the punchwork, and distressed/inked the edge of that as well.


At one end of the card where the 6" panel is not divided by a fold, I made a raised panel with layers of coordinating papers and some fussy-cut flower. When your easel card is standing, this creates a little ledge for the front to rest on to keep it upright.


I chose this lovely frame set for my card, and a coordinating fairy for the bookmark I created, and primed them all with white gesso before adding white glitter embossing powder. I fit a circle of patterned paper behind the frame, then added to the end of the card with the 3" folds, gluing down only the lower half so that when the card is folded to stand, the top part of the frame will stand above it.

I added a chain with a butterfly charm to the simple bookmark design, and poked the hole with a large pin-I got a bunch of these pins at a thrift store one time, and they come in handy for so many things-holes like this, piercing for handstitching with embroidery floss, cleaning out glue and paint bottle tips, etc.

I added some glittery letters to finish off the sentiment on the front of the card after attaching the "Wish" word piece on top of the frame.


I fussy cut a ton of the pretty flowers from my papers and used them to accent the frame, and I love the soft and feminine combination of colours, flowers and fairies, and hope my friend will too! Thanks for stopping by to see; have a terrific week! It's really hot here, so perfect weather to stay inside and craft!


GYPSY SOUL ITEMS USED
Garden fairies, large

Scribble fairy frame

OTHER ITEMS USED

Fabscraps patterned paper
Ranger glitter embossing powder-Bridal Tinsel |
Ingvild Bolme chalk ink-Old Road
Fiskars leaves punch
white gesso
Versamark ink
Ranger heat tool

Sunday, 8 July 2018

"Beautiful"-Marilyn Monroe layout for Scrap & Craft

Hello there! I love the soft greens and greys in this lovely paper line and I knew it would look perfect with this photo of Marilyn Monroe that I've been wanting to use on a page for a while.  I love vintage movies and stars, and every so often I create a layout featuring one.


I stenciled with texture paste and misted here and there, and I couldn't resist making a few more foamiran flowers for added texture.


The leaf sprays were diecut then rubbed onto a green inkpad. The beautiful flowers in the paper pack are perfect for fussy cutting and layering. I randomly punched along the edge with a notebook punch for a little added interest, and added the looped pearl string, which I got at the dollar store.

I hope you enjoyed seeing my page; if you've ever done a celebrity layout, I'd love to see it on our Scrap & Craft Inspiration page!  Wishing you a wonderful and creative week!


Monday, 25 June 2018

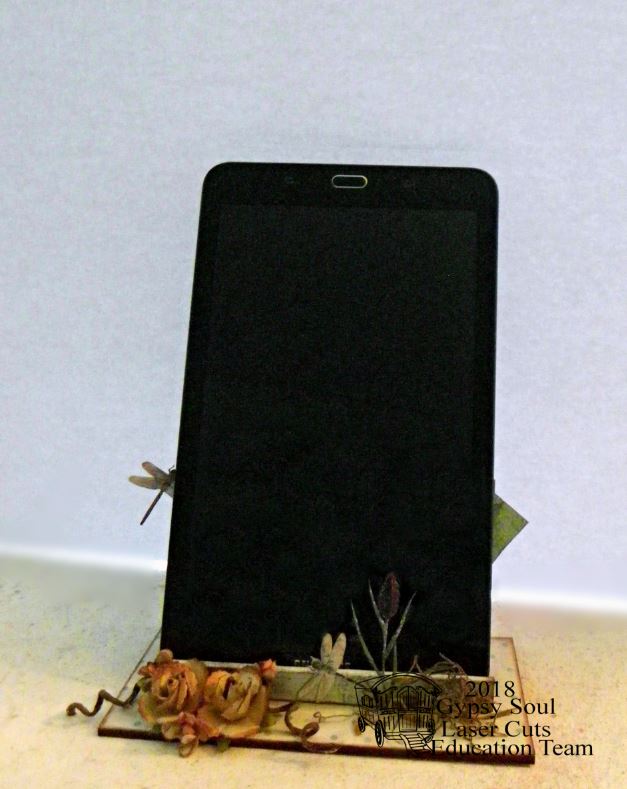
Dragonfly Tablet Holder for Gypsy Soul Laser Cuts

Don't even get me started on the dozens of reasons I hate, loathe and despise cell phones....but I sure do love me my laptop! Recently my amazing bestie received a tablet as a freebie when she replaced the cell phone which she uses for work, and since she knew she wouldn't use it, she passed it along to me!  Since a tablet falls somewhere between phone and laptop, I want to give it a try, but so far haven't used it much. I'm hoping setting it up on my work table in this cute little stand will inspire me to pick it up more often.


This project is simple, consisting of only three pieces. I covered them all with patterned paper; this sheet is from FabScraps. I sanded the edges and inked them with Donna Salazar Mixed Media ink in Leather.


I used the largest of the Damask Singles behind the back piece to add interest and height. I just painted it white, then inked the edges with the same brown ink. I brushed a little Perfect Pearls on it as well, which I also used on the dragonflies on the background paper as well as the two that I cut out and attached.

In addition to the dragonflies, I fussycut one of the plants from the paper, and cut an extra so that I could fold it and layer it on top for a 3D look. I then heat-embossed the whole piece in clear to give it a little extra strength to stand up.


I added a little moss and some flowers to finish the project and complement the outdoorsy feel of the paper.


Now my tablet will be out in the open where I will remember to pick it up and play with it more often...thank you, Bestie, and Gypsy Soul Laser Cuts!!


GYPSY SOUL ITEMS USED


OTHER ITEMS USED
FabScraps 12x12 paper-Peaceful
Donna Salazar mixed Media ink-Leather
Perfect Pearls powder-Pearl


clear embossing powder, Versamark ink

Monday, 11 June 2018

Getting Organized with Gypsy Soul Lasercuts

Hey there! Lynne here with the new Organizer System that I've been looking forward to putting together for a while now...I just had to find a paper pack with colours and patterns that would look good in my craft room and coordinate with my other storage before I could make this. I found a Recollections pack at Michael's that was perfect.


I decided to put all the pieces together before papering them because there were so many pieces and I wanted to make sure I put the right patterns in the right places. It's of course perfectly fine to paper everything first, and I usually do, but this worked well for me on this project.


After putting the pieces together, I painted all the edges white, then adhered patterned paper (since I couldn't trace around them like I usually do, I actually had to do some measuring, but it was pretty simple and I lived to tell about it-lol1)

I inked the edges/joints of the paper with honey-coloured ink.


I like my storage to be labeled, so I used a combination of the Miniature Bookplates and the Stackable Labels. I ran them through my Cuttlebug in a damask embossing folder, then heat embossed them with a white enamel called Jasmine.


The bookplates didn't have labels to stack, so I made them by tracing the centers onto boxboard, then making them a little larger before cutting them out. I covered all the label pieces with patterned paper that was light enough to write on, and again inked the edges in the honey colour. I glued them onto the drawers and bins with a hot glue gun


The organizer pieces can be arranged so many different ways, depending on your preference and the space you have for them. After I had taken all my photographs and filled my bins, I noticed that some people also used them on their sides like cubbies. For my purpose (tall packages) the upright position was more practical though.  I thought they looked nice spread out like these examples as well, but I decided to use them on top of a set of drawers that was too narrow for this configuration.


I love the versatility of these pieces; you can finish them so many different ways and arrange them to fit any area. I look forward to seeing what you decide to do with them; be sure to share on the Gypsy Soul Lasercuts Craft Group page on Facebook!

GYPSY SOUL ITEMS USED

Miniature Bookplates Shape Set

Stackable Labels Shape Set

OTHER ITEMS USED

Donna Salazar Mixed Media Ink-Honey
-embossing powder-Jasmine

Recollections Paper Pad-English Rose Garden