Saturday, 17 September 2016

The Legend of the Flying Cookie

Wellthis is a different sort of post for me; usually I'm just showcasing new art pieces. Today I'm sharing a story about "where it all began"-more or less!

 I just started a new art page on Facebook and I have called it "Flying Cookie Creations"....here's why:

I've been somewhat of a papercrafter all my life and by about 2007 had been dabbling in cardmaking and photo calendars. Scrapbooking was popular but I hadn't jumped on that bandwagon yet.

One of my daughter's teachers was retiring and the students in her class had all done little writeups about Mrs. J  to help out one of the other teachers who had to give a farewell speech about her. I got thinking what a nice gift it would be to put these little tributes together into a book for her and I offered to do so. Mr. A , the other teacher, thought it sounded like a great idea and was happy to pass the student's writing onto me.

WELL!

Of course the creative wheels got turning and I thought, "hmmm-wouldn't it be even better if I  added a few photos to the collection  to make it more of a keepsake of her last class?"  So I ransacked my photo stash , then asked a few other parents from the class if they had any to share. The photos came pouring in and I got excited about putting this little project together.

The wheels continued to turn and the next step was patterned paper...there was SO much awesome paper out there!! I realized this was turning into a bit of a larger project than I had originally envisioned and ended up using a 12x12 album to house this "little" collection of stories and pictures.

Now , many of the students in this class had known each other for years-some even before they had started kindergarten; classes change and people move over the years so there were some people in the photos that this teacher had never met.One such photo was taken at a class pool party a couple years before and included a student who had moved away. It was such a great photo though-my daughter and I conferred and decided to cut him out of the picture. No problem-except Sam , the person in question ,was photographed while eating a cookie which he was holding up partially in front of another student. When I cut him out (yup-you got it!) the cookie remained! We decided we'd find a way to cover or disguise the cookie later on-perhaps with a sticker or other embellishment.

The album was finished and duly presented and THEN I remembered that I  had forgotten to cover the flying cookie that was all that remained of poor Sam! Every time my daughter and I talked about it we giggled wondering if Mrs. J had ever noticed a UFC (unidentified flying cookie) one one of her album pages.

Before long I  became a passionate scrapbooker and scrapped everything in sight; of course we all have "oopses" on our pages from time to time and after a while we started to refer to them and the tricks used to cover them as "flying cookies". Before long anything used to cover up a mistake or mess was referred to as a "flying cookie" in our house...for example-a blotch of ink? Put a flying cookie on it! A mark on the table? Use a vase as a flying cookie...you get the picture.

Well in honour of my first foray into scrapbooking as well as a fun story that evolved between my daughter and I, my unofficial 'business" name for my art is Flying Cookie!!
 ,
                                                                             
Thanks so much for stopping by and reading my story-hope it gave you a giggle. If you have any fun stories that have evolved from your crafting I'd love to read them!

Monday, 12 September 2016

Celebrate-90th birthday card and gift bag for Gypsy Soul Lasercuts

Well hi there folks! A dear friend of mine is having her 90th birthday the end of September (and a surprise party...SHHHH!) so I  decided to create a card and a little gift bag especially for her.


 I used Blue Fern Studios "Frolic" papers to cover the card and bag and added a little edge punching with a Martha Stewart punch. I inked the edges in a soft pink and did a bunch of fussy cutting which I popped up in spots with foam tape for dimension.


The cake piece was fun to decorate; to simulate the look of cake I mixed a little salt in with  the yellow acrylic paint. he icing is texture paste sprinkled with microbeads and the candle is patterned paper run through an embossing folder then heat-embossed with clear embossing powder. The flame of the candle was heat-embossed in antique gold then rubbed with a little orangey-red ink.


The heart border strip single heart and gifts outline were primed with white gesso then heat-embossed with Bridal Tinsel glitter embossing powder. I then used a glue pen on them
before covering them with white glitter. (My friend likes sparkly things!!)

The gifts were covered in patterned papers;  I used a different paper for each package to give more contrast then I added the outline piece that was all glittered up. I love all the pieces in the Birthday Shape set but I  think these gifts are my very favourite!


Thanks so much for stopping by; wishing you a wonderful and creative week!

GYPSY SOUL ITEMS USED
Birthday Shape Set 
 Border Sticks-hearts

OTHER ITEMS USED

Blue Fern Studios 12x12 papers-Frolic
Ranger embossing powder-bridal tinsel
Dew Drop ink-angel pink

Monday, 5 September 2016

Rear Window-a Silver Screen layout for Gypsy Soul Lasercuts

I've always been a bit of an old-movie buff, so I started an album with layout of classic stars and favourite movies a while back. It's been quite a while since I've added anything to this album so I decided it was time.

Rear Window is an Alfred Hitchcock film made in 1954 starring James Stewart (my favourite classic actor) and the lovely Grace Kelly, who later became Princess Grace of Monaco. Since the main character is laid up and passing time by watching the neighbours through the windows, I decided to use a variety of chipboard pieces to emphasize this theme..the windows for obvious reasons, but also the cameras since he was taking photographs of what he saw, the glasses to repeat the looking theme ,and the bricks to continue the image of the brick apartment building as shown in the promotion photo I used.

I painted the windows with black acrylic paint, then stamped here and there with Versamark before heat embossing with Ranger Antiquities embossing powder in California Stucco to give them a worn look.

The cameras were painted silver then inked in black. I then coated them with 2 layers of UTEE for a glossy finish. I used foil tape to create the lens.

The glasses were painted in a light rust colour, then inked with a slightly deeper tone. I stuck Rain Dots in the corners to give the idea of the gems that were often on glasses back then.


The bricks were painted white then rubbed with rust/brick coloured inks.

The two photos I used came from Google Images; I used them as a basis to decide my colour scheme. This page is an example of combining a lot of different types of Gypsy Soul pieces into one cohesive theme. You may have fun thinking "outside of the box" (or the window!) for unique and interesting ways to combine your chipboard pieces...can't wait to see what you come up with!

GYPSY SOUL ITEMS USED
Brick Wall
Windows 4 panel
Windows 4 panel square
Windows 6 panel
Eyeglasses Shape Set

OTHER ITEMS USED
Tim Holtz paper
Ranger Antiquities embossing powder-California Stucco
Versamark Ink
UTEE embossing enamel

Monday, 29 August 2016

Shabby Chic Treasure Chest for Gypsy Soul Lasercuts

hello crafty friends-happy Monday!! (although many people feel the words "happy" and "Monday" have no business being in the same sentence-lol) Here's my take on the adorable Treasure Chest that Gina recently added to the Gypsy Soul store; I love the size and the solid feel of it-perfect to store small items in or to use as a gift box for someone special.


I used FabScraps papers that are appropriately named "Shabby Chic"and covered the inside pieces of the box before putting it together, then covered the outside; I was able to wrap one 12x12 strip around the front and sides so that the only seams are in the back. I used a similar process to cover the two overlay sectionstucking lace under each of them before attaching them; I found hot glue worked best to attach both the lace and the chipboard strips.


The top was papered as well; I layered the punched out center of the cutout lid piece on top of the main lid piece for more dimension. When the box is opened you are able to see the cutout piece. I also decided to add hinges.


On the top of the box I added some lace loops and some edge-punched loops cut from the same paper as the box is covered in, then some paper roses, burlap foliage, and metal leaves to match the metal heart lock I hung on the front. I inked some edges here and there for an even shabbier look ,but I have to admit those gorgeous FabScraps papers did most of the work in that regard! 


This was such an enjoyable project to create and I can't wait to see how you decorate your own Treasure Chest-be sure to tag me when you post it on the Gypsy Soul Craft Group Facebook page so I don't miss it...have a terrific week!

GYPSY SOUL ITEMS USED
Treasure Chest-coming soon!

OTHER ITEMS USED
FabScraps Shabby Chic papers
small hinges from dollar store
Donna Salazar inks
Fiskars punch

Monday, 22 August 2016

My Irish roots-heritage layout for Gypsy Soul Lasercuts

A while back my aunt passed her collection of old family photos on to me and I've gradually been scrapping them and adding them to my heritage albums. This photo shows my great-great grandparents; he came over from Cork Ireland during the Potato Famine in the 1850s as a young man. She was French and born in this area.  


I chose to create a heritage page this week so I could feature one of the gorgeous vintage lampposts from the Gypsy Soul store; I think they're so elegant and make a fabulous focal point to a page. This is the large Double Lamp Post. I painted it with acrylic paint then used Ranger crackle finish in Rock Candy before rubbing it with moss green and dark grey inks. The flames were created by blending alcohol inks on clear acrylics; after they were dried I cut them out and layered them using the jagged edges for a fiery look.


The whole layout was made using the Kaisercraft Rustic Harmony paper collection; the florals were perfect for fussy cutting and layering and then adding a couple of the smaller Ornate Doilies from the store just finished the flower clusters off perfectly with an added vintage touch.


.


 I added some stencilling with my beloved texture paste and a few random sprays and spatters of olive green mist to pull the colours together and voila...another entry in the store of my family!

Thanks ever so much for visiting and I hope you're able to find some happy creative time for yourself in the coming week!

GYPSY SOUL ITEMS USED

                                                      Single & Double Lamp Posts large
Ornate Doilies-returning to the store soon

OTHER ITEMS USED
Kaisercraft Rustic Harmony 12x12 collection
Ranger crackle finish and alcohol inks
Ranger Distress Inks-Antique Linen and Weathered Wood
Donna Salazar Ink-Mossy
Martha Stewart edge punch
Prima and Crafter's Workshop stencils

Monday, 15 August 2016

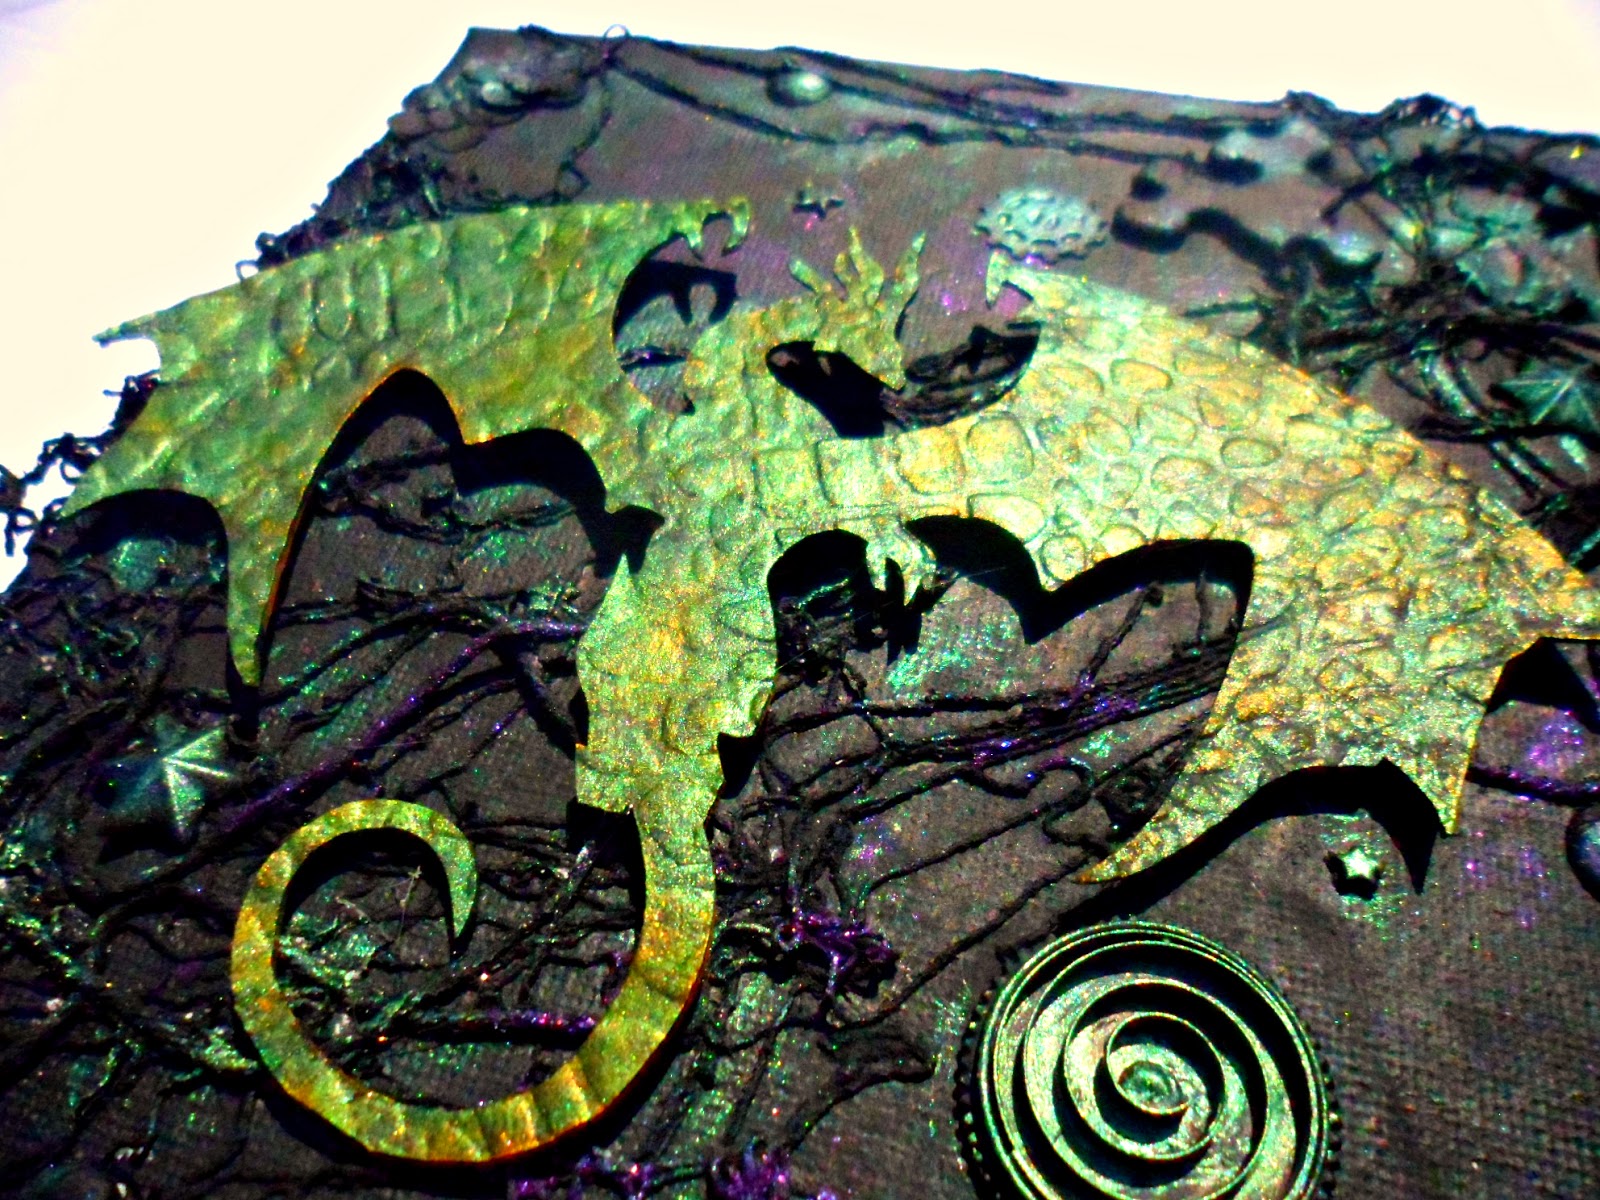
Dragon's Lair-a mixed media canvas for Gypsy Soul Lasercuts

I've gone over to the dark side....well at l,east with this project! I love the Dragons Shape Set and have been waiting for the chance to use one of these awesome fairy doors ,so I decided to combine them for a little medieval magick...

I created a background with texture paste-stencilled bricks and some stringy fabric, then I added a variety of metal embellishments, flowers, and puzzle pieces as well as some torn corrugate.
After all those things were glued down I painted the entire canvas and the chipboard pieces with black gesso. I added colour with a variety of Luminarte Radiant Rain colour concentrate daubers and  Silks paints.The dragon and inner door piece were both run through an embossing folder first and  I love the effects that the paints created on the embossed area. I used several colours on the dragon to get the look of iridescent scales and  think it turned out pretty dragon-y (is that a word? well, it is now!!


The door door trim has an overlay so I added a combination of colours to the base piece and just used the solid nutmeg dauber on the stone overlay to create contrast.


I added vibrant colours here and there to make the embellishments and the different colours stand out from the black background-they look really shimmery in person.


I love the rough texture of the bricks-I used homemade texture paste made with baking soda; because of their rough texture  a fair amount of the black still shows through the Ginger Peach Silk paint for an ancient and worn look.

Thanks so much for stopping by and may all your dragons be friendly!

GYPSY SOUL ITEMS USED
Dragons Shape Set
Fairy Door-Amy Love

OTHER ITEMS USED

Colourarte Silks-Ginger Peach,. Iridescent Green, Kiwi
Radiant Rain-Nutmeg, Wine and Roses
Crafter's Workshop Stencil-bricks
Prima Finnabair Mechanicals

Monday, 8 August 2016

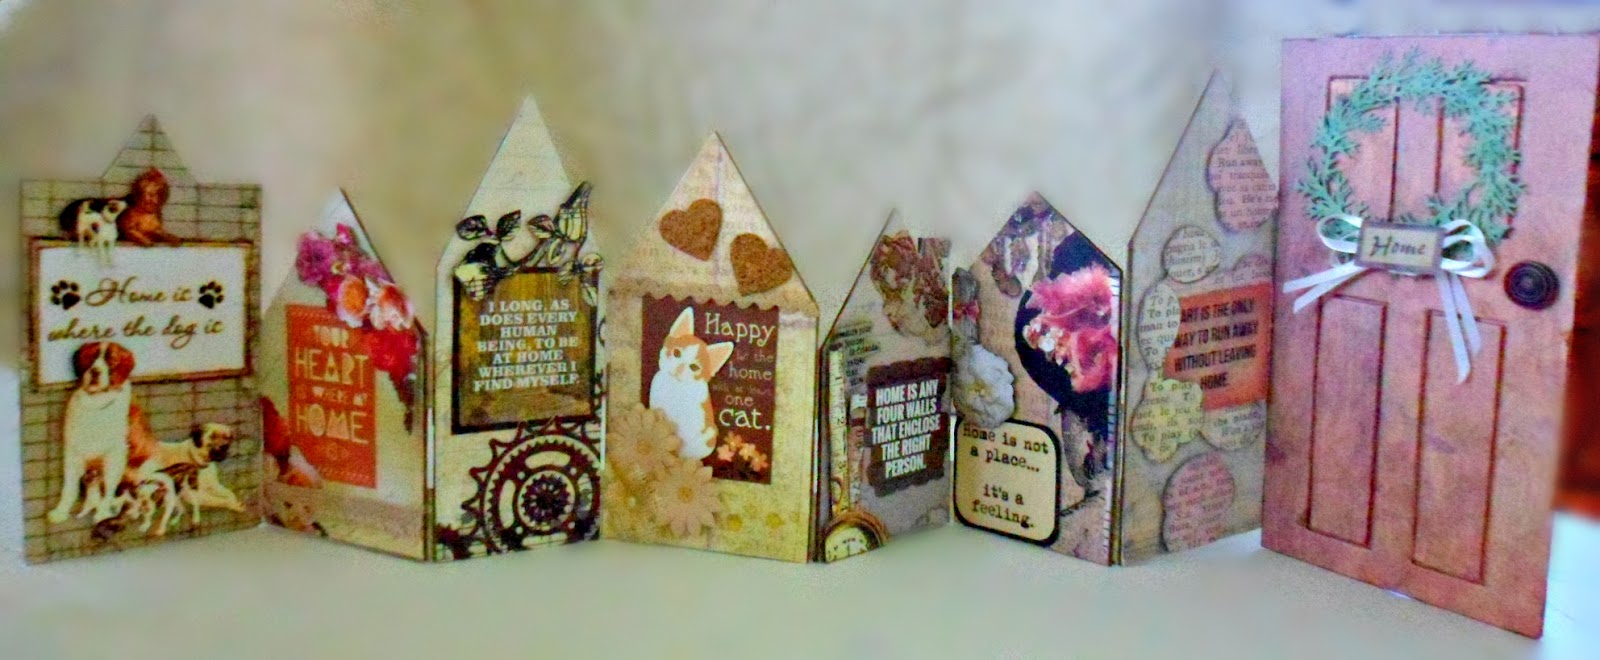
"HOME"-House Oddities Box for Gypsy Soul Lasercuts

hello crafty friends!

This awesome 3D item in the Gypsy Soul store intrigued me right away, but it took me a while to decide exactly how I wanted to use it. I decided to interpret the house theme figuratively by finding quotes that contained the word "home", but didn't necessarily have anything to do with actual houses...after all, to coin a phrase-home is where the heart is!


I really love the front door piece; it has the panels marked off in a way that even if you simply wanted to paint it you would get the look of a raised-panel door. I decided to cover it with woodgrain patterned paper,so I removed the pieces and covered the panel centers with paper separately. When I  reassembled the door I left out the piece that went around each center panel and backed the openings with the same paper to create more dimension. I was happy with the effect this method created; anyone familiar with my style knows I  love texture and dimension. A wreath made of punched branches and a metal brad doorknob finished the  door.

I used Donna Salazar Antiquities papers for the entire project and the quotes I used were all found on Google Images (I did edit them so the colours would coordinate with my papers though) I love to fussy cut, so after the house pieces were papered and the quotes were attached I added several fussy cut bits for interest. The dog images were from Graphic 45 Raining Cats and Dogs paper.I used small wings from the Steampunk shape set on one of the houses, painting them white then heat embossing them with glitter embossing powder.

The houses were attached to each other and to the door piece with hinges made of masking tape; once they were covered with paper they were plenty strong enough to hold things together.


I had so much fun looking for quotes I liked and then embellishing each little house like a mini-canvas. I don't know if this was actually meant to be a double-sided project but I kept finding great quotes that I wanted to include and ended up finishing both sides...and even then there were a few quotes I had to leave out!


There would be so many different ways you could finish this unique project; it would make a great mini-album with photos...possibly with memories of all the houses you've lived in, or to tell the story of a house being built, or even a housewarming party! I'm sure you can think of all sorts of possibilities. I had also thought it could be interesting to create an address book of sorts....hmmm....I just might need a few more of these!

GYPSY SOUL ITEMS USED
House Oddities Box
Steampunk shape set

OTHER ITEMS USED
Donna Salazar 12x12 Antiquities paper pack
Graphic 45 Raining Cats and Dogs paper
Tim Holtz distress ink-vintage photo
Ranger glitter embossing powder-bridal tinsel